Piano Path
I wanted to play solo piano. A melody, a left-hand part, a complete piece of music. But as a beginner, looking at sheet music felt like several tasks arriving at once: decode the symbols, find the keys, coordinate two hands, and get the timing right.
YouTube tutorials felt more approachable. Someone would say: press this key with your right hand, these three with your left, keep the left hand down, then move the right hand here. I could follow that. I could even remember a short sequence of instructions.
That became the question behind Piano Path: could a tool give me those instructions, with enough context to practise on my own?
Open Piano Path · Source on GitHub
It started as a deck of cards
The first idea was physical. A playing card, held sideways, with eight columns across and four pairs of rows. Right hand above left hand. Each cell would contain a key address such as C4 or G3. A small deck of pieces I could keep near the piano.
I imagined shuffling the deck, picking a few cards, and practising whatever came up. Then the details started exposing the problems.
A passage might begin with notes already held from the previous card. Thirty-two columns did not mean thirty-two beats, or one minute of music. Some moments contain a chord; others contain only a release. A single hand can hold one note while its other fingers play a moving line.
So the shuffle idea went first. Cards would stay in order, grouped by piece. Then came the bigger question: who would make them? Manually translating five little tunes was possible. Building a useful collection that way would be tedious, and every transcription was another opportunity for a mistake.
Here is a mockup of where that card idea was heading. The front has four pairs of hand rows, with eight action steps in each pair. The example is a little original exercise, rather than a transcription of a song. Card 01–01 means piece 01, card 01.
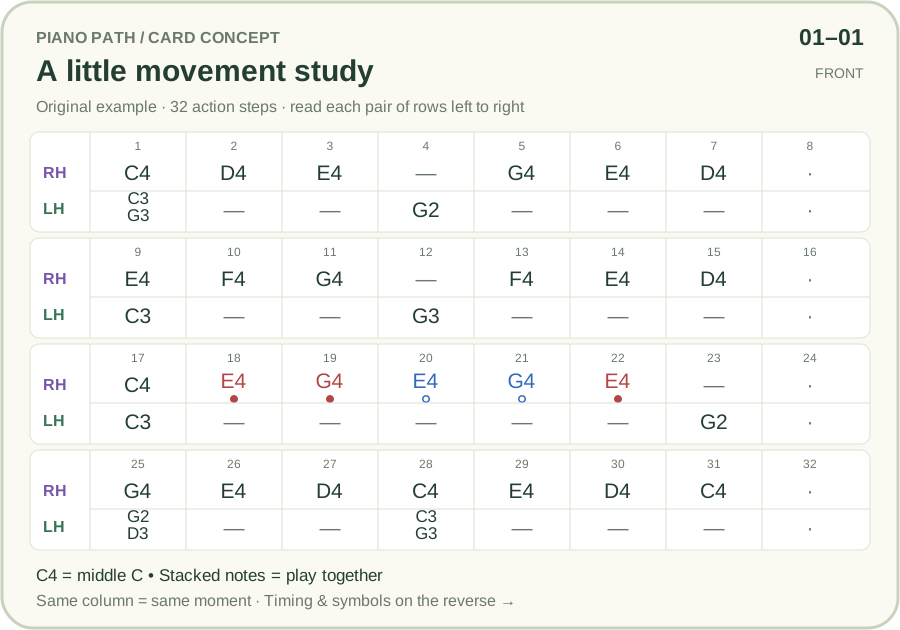
Front: just the next actions. Steps 17–24 show why selective additions and releases matter: C4 stays held while other right-hand notes change.
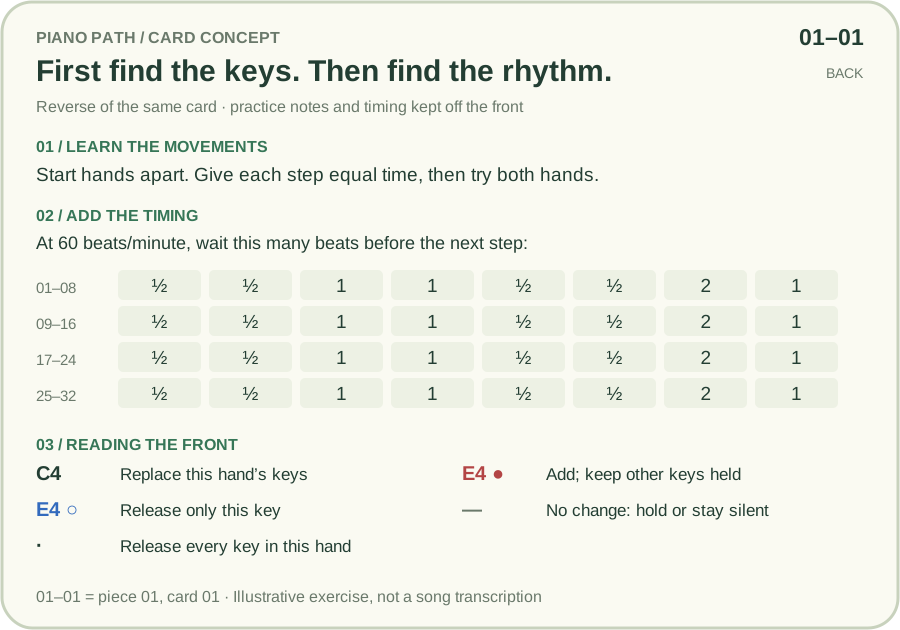
Back: the timing and a reminder of the symbols. Each timing value says how long to wait after the corresponding front-side action. Equal spacing would be a first practice pass; the reverse would supply the intended rhythm. These are enlarged concept mockups, not a card-printing feature in the finished app.
The useful part of the idea was the compact instruction sequence. The physical card was just the first container I had imagined for it.
The discovery that changed the plan
I found MuseTrainer and its MusicXML library. It already demonstrated much of what I wanted: play a score, light up a keyboard, change the speed, choose a passage, and connect a digital piano.
That made the next version much clearer. Put the key instructions where the sheet music would normally be. Make the keyboard larger. Label the relevant keys. Let the instructions scroll horizontally, so there is always a little of the next passage visible.
The final tool is a browser app hosted on GitHub Pages. The cards disappeared. Choosing a piece, isolating a short passage, and repeating it survived.
The library also became the home screen. Having dozens of available arrangements but making myself upload each one separately would have added work before I could even start practising.
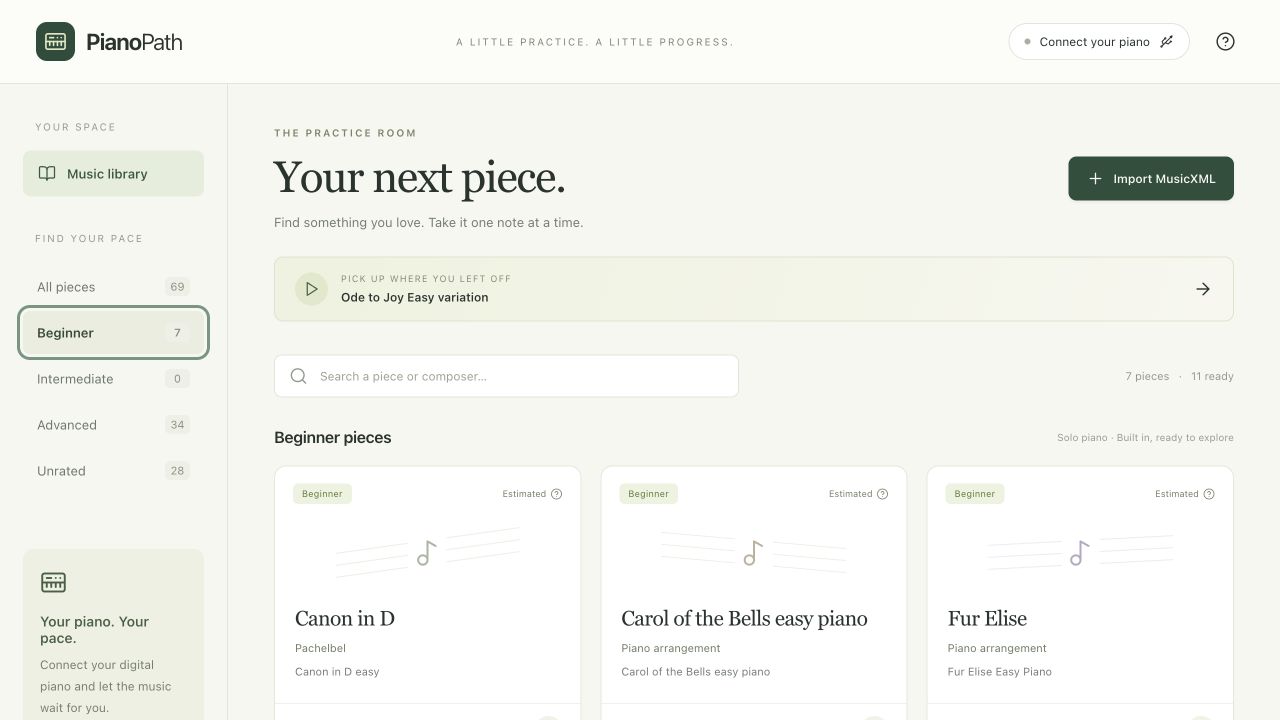
The starting point is a piece to practise, with search and difficulty filters. The current collection contains 69 arrangements.
A key address is something I can act on
The notation uses ordinary note names and octave numbers. C4 is middle C. C5 is the C an octave above it. F#4 identifies the black key immediately above F4. These names already exist; the custom part is how the app arranges them into instructions.
There are two rows: RH for right hand, LH for left hand. Read from left to right. Both hands act together within a column. Several names stacked in one cell mean press those keys together.
For a simple passage, the rule is almost enough by itself: release that hand’s previous keys and press the next ones shown. A dash means leave the hand as it is.
But “release everything and play the next note” breaks down surprisingly quickly. Imagine holding C4 with one finger while another finger plays E4, then G4. C4 needs to stay down when E4 changes. That requires instructions for individual keys.
The small vocabulary is:
| What appears | What to do with that hand |
|---|---|
| Ordinary note names | Release the previous keys, then press the listed keys together. |
| Red note name with a filled dot | Add that key while keeping the others down. If it is already held, release and press it again. |
| Blue note name with a hollow circle | Release just that key. |
| Dash | Make no change: keep holding, or stay silent. |
| Standalone dot | Release every key in that hand. |
A blue E4 and a red G4 can therefore appear together while C4 stays held. The instruction changes only the fingers that need to move.
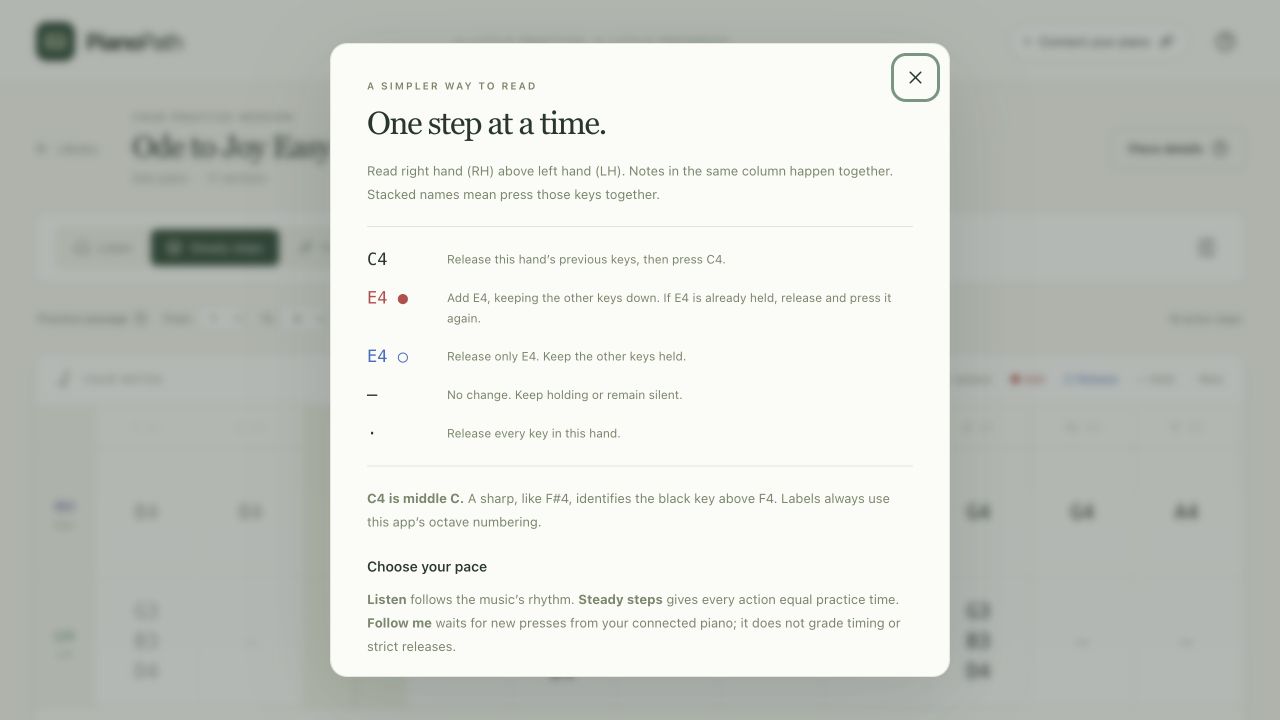
The dots reinforce the colors, and RH/LH labels remain visible. There is a short guide inside the app whenever I need a reminder.
The keyboard uses a different pair of colors: purple for the right hand, green for the left. Red and blue answer “what action?”, while purple and green answer “which hand?” Using the same colors for both would make the instructions ambiguous.
A step is a change, not a beat
This was the most useful clarification in the whole design.
A column represents a moment when either hand needs to press or release something. Both hands may act, or one may move while the other holds. The next column might come very soon, or after a long pause. The spacing on the screen alone does not tell you the musical rhythm.
That distinction lets the same passage support three ways of practising:
| Mode | What it does | What I want it for |
|---|---|---|
| Listen | Plays the written rhythm, with adjustable playback speed. | Hear how the passage fits together. |
| Steady steps | Gives each action the same amount of time. | Find the keys and practise the movements slowly. |
| Follow me | Waits for the required new key presses from a connected digital piano. | Work through the passage without racing a recording. |
Equal spacing is a deliberate compromise. It changes the rhythm, sometimes substantially. I wanted permission to concentrate on finding the next keys before trying to do everything at performance speed. Once those movements become familiar, Listen provides the original timing again.
This is a practice preference, not a claim that rhythm can be ignored indefinitely. Knowing the sequence of keys is one part of playing the piece.
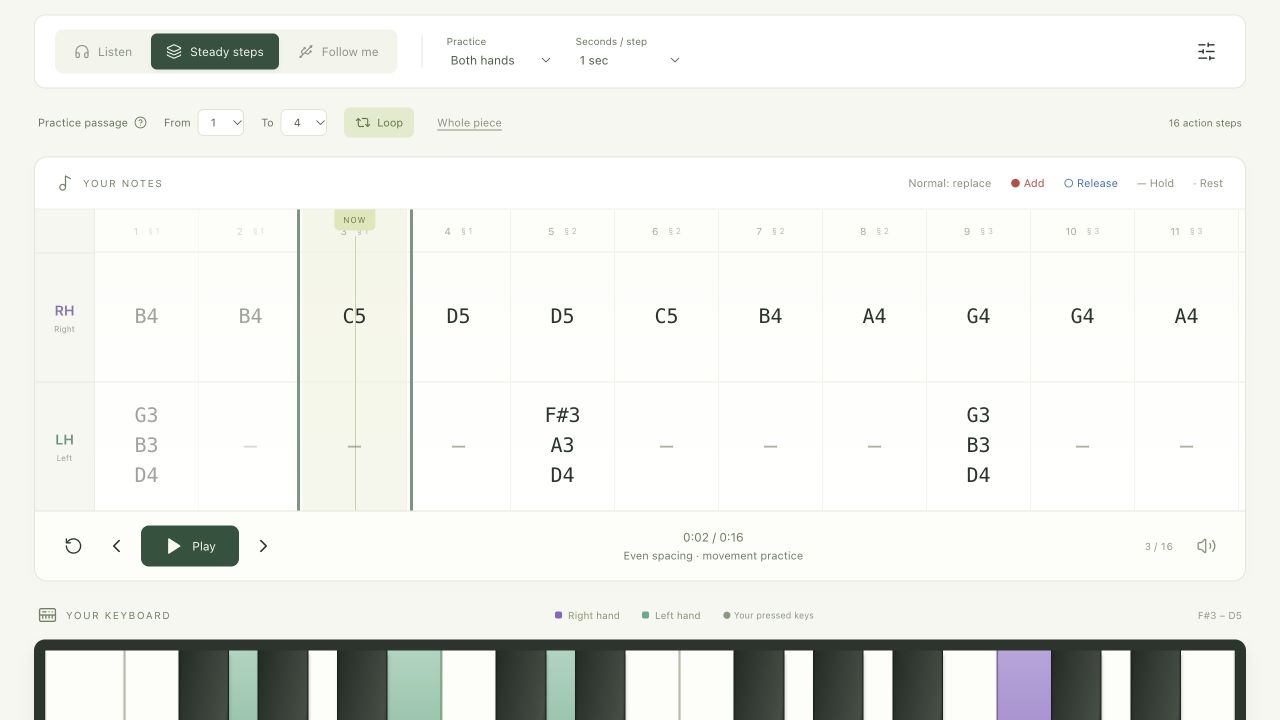
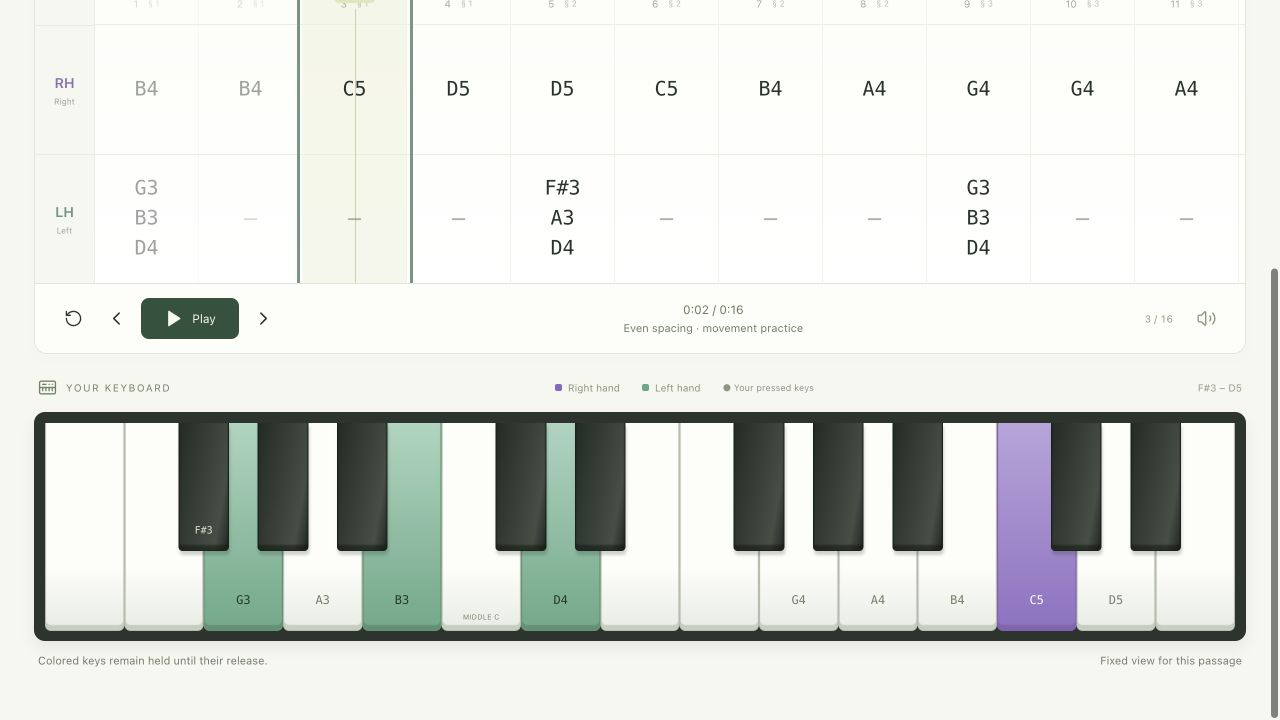
The passage above has 16 action steps. They are evenly spaced for movement practice; they are not 16 musical beats.
Keep the keyboard still
An entire 88-key keyboard squeezed into a laptop screen makes the useful keys tiny. Constantly zooming towards the next note would create a different problem: the reference points would keep moving.
Piano Path fits the keyboard to the selected passage, with a little space on either side, and holds that view steady. Used keys carry addresses. Middle C is marked whenever it is visible. Keys remain highlighted while they are held, so the picture shows the current hand position rather than just flashing on each new note.
That matters in the opening screenshot. The right hand has moved to C5, but the left-hand G3, B3, and D4 are still green. The dash in the left-hand row means those fingers can stay where they are.
The notation tells me what changes. The keyboard tells me what the result should look like.
Let the piano tell the app what happened
I have a digital piano that can connect to my laptop. Discovering MIDI input made the project more interesting.
MIDI sends key-press and key-release messages directly from the instrument. The app does not need to listen through a microphone and guess which notes it heard. That makes it possible for Follow me to wait while I find the next keys.
The mode is deliberately forgiving. It checks new presses, including repeated notes, and can accept the notes of a chord arriving slightly apart as long as the required new keys end up down together. It does not grade my timing, fingering, expression, or exact release durations. Steps containing only releases advance automatically.
That boundary matters. A screen advancing means I found the required new notes. It does not mean I played the passage beautifully, or even used sensible fingers.
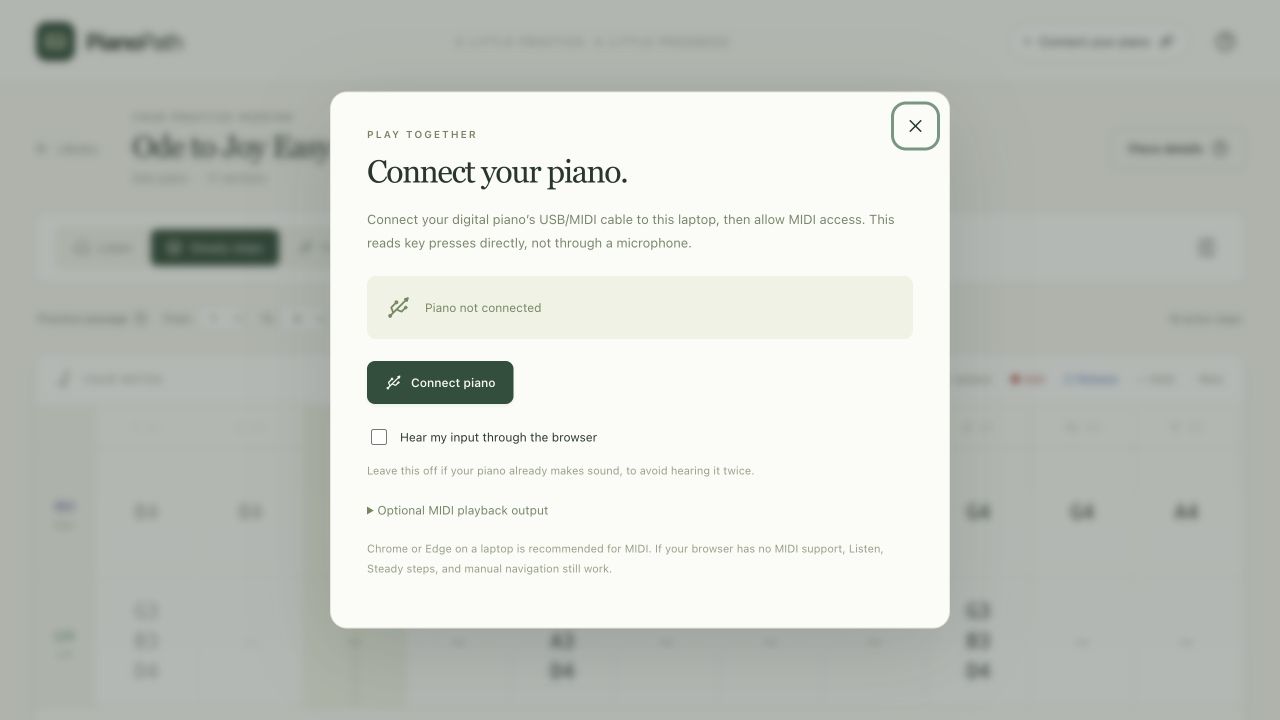
Connection is optional. Listening, evenly spaced practice, and manual stepping are still useful without a MIDI device.
To connect, plug the piano’s USB/MIDI interface into the laptop, choose Connect your piano, then Connect piano, and allow MIDI access. Select the intended input if several devices appear. The app recommends desktop Chrome or Edge for this workflow.
If the instrument already makes its own sound, leave Hear my input through the browser off. Otherwise one press can produce both the piano’s sound and the browser’s sound. The browser demonstration uses a locally synthesized piano-like tone; it is a guide to the notes and timing rather than a concert-piano recording.
Why MusicXML is the starting point
I initially thought about feeding the tool MIDI files, or even uploading pictures of sheet music. MusicXML was a better fit for this version because it contains structured score information: notes, durations, staves, and other instructions that the translator can read directly.
A picture first needs its symbols recognised correctly. A MIDI file can describe a performance’s notes and timing, but it does not necessarily say which hand should play them. MusicXML gives the app more of the score’s structure to work with.
The app reads that structure into a sequence of musical events. The scrolling instructions, sound, and keyboard all use that same sequence. If a note continues through several steps, the display needs to preserve it until its release, rather than accidentally treating every column as a fresh chord.
There are still limits. The usual upper-staff/right-hand and lower-staff/left-hand assignment is a starting assumption. Extra staves, notes crossing between staves, ornaments, and other score features can need review. The app flags unsupported features and offers a supported-note preview instead of silently claiming a perfect translation.
It currently imports .musicxml, .xml, and compressed .mxl files. A PDF or photograph of sheet music is not an input format.
“Beginner” needs to mean something
I wanted a beginner filter because a library of impressive titles is not very helpful when I cannot play them yet. But the title of a composition is not a difficulty rating. A simplified arrangement of Für Elise and the full piece are different practice commitments.
The current labels are estimates or Unrated, not verified teacher grades. An arrangement explicitly titled “easy” or “beginner” gets an estimated Beginner label. A conservative check for density and large spans identifies some Advanced candidates. Other arrangements remain Unrated. The details explain the basis and link to the source.
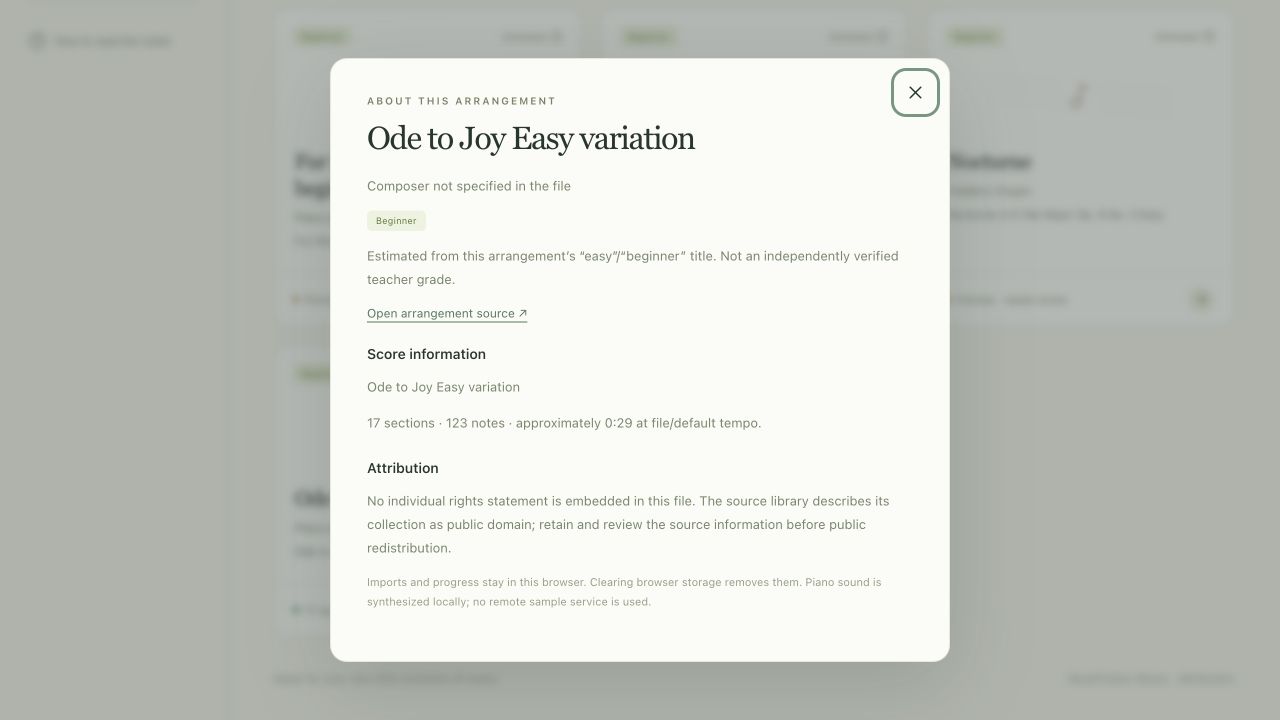
Difficulty and translation readiness are separate questions. “Ready” means no detected review warnings, not “easy” or “checked by a pianist.”
Keeping those uncertainties visible is especially useful for someone like me. I cannot reliably inspect a complicated score and correct the translator myself. A clear warning helps me choose a simpler, better-supported starting point.
A first practice session
The workflow I designed around is small enough for a short session:
- Open the library, choose Beginner, and try a ready arrangement such as Ode to Joy Easy variation. Check the arrangement name, not just the composition title.
- Choose a small range using From and To. A section is a numbered measure in the piece. Four sections are plenty to begin with; use less if needed.
- Listen once to hear the passage. Slow the playback if it goes by too quickly.
- Select Right hand or Left hand and work through its movements. Use the arrow buttons, laptop left/right arrows, or click a column to inspect individual steps.
- Switch to Both hands. Use Steady steps at a comfortable interval, or Follow me with a connected piano. Turn on Loop to repeat the passage.
- Return to Listen and practise the actual rhythm. Expand the passage when the smaller part feels manageable.
For another piece, use the built-in library or Import MusicXML. Imported scores, preferences, and saved position stay in that browser. There is no account or automatic sync between computers; clearing browser storage removes those local records.
What I wanted to make easier
Changing the display does not remove the physical difficulty of piano. A large leap is still a large leap. Coordinating two hands still takes work. Letter instructions can themselves become crowded in intricate music, and this view does not teach everything that staff notation communicates. It also does not tell me which finger to use.
What it can do is reduce one source of friction. I can look at a short passage and answer: which keys now, which hand, and what stays held?
The project began with a deck I could shuffle. It ended with a quieter kind of practice tool: choose a piece, make the passage small, see the next action, and take the time to find it.
Try Piano Path · Browse the code and documentation · Explore the MuseTrainer score library